
Adding a Study
Some researchers choose to set up their studies in the system before they have received the proper approvals (usually from their IRB) to run the study. This is supported in the system. You can set up a study but specify that is it not visible to participants (this is the Approved setting). That way, as soon as your approval is received, you can simply make the study visible and everything is already prepared. You can also post a study and make it visible immediately, if that is appropriate. Some systems will be configured in such a manner that only the administrator can approve the study, in which case you will need to contact the administrator to do so.
Adding a New Study
To add a study, choose the Add New Study option from the top toolbar. You will have the option to pick from four possible types of studies. You may need to specify if the study is for credit or payment. Please choose these options carefully as you will not be able to change them later.
After you choose the study type, you will see a form asking for more information. You will need to fill out a number of fields, which are explained in the following table. Some of the fields listed below may not appear depending on how your system is configured, and the type of study you selected. All fields in the Basic Study Information section must be filled out unless otherwise noted.
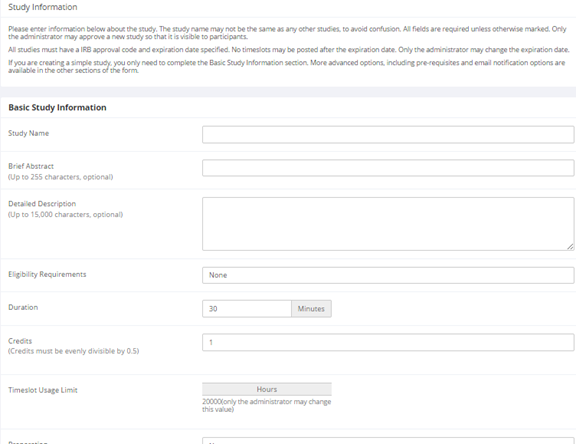
Basic Study Information
| Field | Explanation |
|---|---|
| Study Name | A short name for the study. This is how the study is identified throughout the system. Most systems are configured so studies show in a random order to participants (choose Your Studies on the toolbar and it will state at the bottom of the resulting page if they are displayed in random order), so there is no advantage in choosing a study name that might put it at the top of an alphabetical list. You should consult with your administrator if there is a naming convention to be followed when naming studies. Study names must be unique, and you will be prevented from adding a study if there is already another study in the system with the same name. A study name may be up to 100 characters in length. |
| Brief Abstract (this feature might be disabled on your system) | This is a short one or two line description of the study. This short description will be displayed to participants when they view the entire list of studies, so it may be beneficial to list the most pertinent details here. Studies configured for payment often have the compensation information included in this section, particularly if the payment varies based on certain outcomes. This field may be optional, and can be up to 255 characters in length. |
| Detailed Description (this feature might be disabled on your system) | This can be a more long-form description about the study, and it will show if a participants clicks on the study to get more information before they sign up. You may include basic HTML in this area (ask your IT department for help if you are unsure of how to do this). This field may be optional, and can be up to 15,000 characters in length. |
| Eligibility Requirements | If there are any restrictions on who may or may not participate (for instance, only those who are left-handed), list them here. Otherwise, leave the field as-is. If you list any restrictions, these will be displayed on the list of studies when participants view a list of all available studies. Note the system does not enforce these restrictions, but it is expected that a participant will only sign up for a study in which they are qualified, as they would otherwise fail to receive credit. In most cases, you will leave this field as-is and set prescreen participation restrictions instead (those are enforced automatically), which you can do after you add the study. This field may be up to 245 characters in length. |
| Duration | The amount of time, in minutes, that each study session will take. If you are setting up a multi-part study, then there will be the option to specify the duration for each part of the study.
For online studies, this should be an estimate of how long participants can expect the study to take, so that they can plan accordingly. |
| Credits (applies to credit studies only) | Enter the number of credits a participant will earn for the study. A value of 0 is acceptable and may be desired in cases where the study is part of a set of studies, and only the final study is credit-earning. The credit value specified must be evenly divisible by the credit increment specified. For example, if the increment is 0.5, then the study can have credit values like 1 and 1.5, but not 0.75.
If you are setting up a multi-part study, there will be options to enter credit values for each part of the study. The system will compute the total credit value of the study automatically. After a study has sign-ups, you may not change the credit value of the study. However, the administrator can still change the credit value of a study with pending sign-ups. If this is done, be sure to notify participants with pending sign-ups of the change, as the system will not notify them automatically. A study may not be changed between a study for credit and for payment, after it has been created. |
| Payment (applies to paid studies only) | Enter the compensation for the study. This is a text field, so any text may be entered like “Amazon Gift Card” or “Up to $20” and so on. Please see the Studies for Pay section of this documentation for more information on how to fill out this field in the case of paid studies.
If you are setting up a multi-part study, there will be options to enter compensation values for each part of the study, as well as a total compensation value. You can change the payment text at any time. If this is done, be sure to notify participants with pending sign-ups of the change, as the system will not notify them automatically. This field may be up to 30 characters in length. A study may not be changed between a study for credit and for payment, after it has been created. |
| Timeslot Usage Limit | Depending on how your system is configured, you may see an item that specifies the maximum number of study session hours available to this study. The administrator sets this value, and is the only one who can change it. To determine the current session usage for a study, go to the Add A Timeslot page for the study, or to the Timeslot Usage Summary. |
| Preparation | Enter any advanced preparation a participant must do here (e.g. “do not eat 2 hours before session”). If there are no preparation requirements, leave this field blank. |
| Researcher(s) | Select the researcher for this study. Most likely, this is you, and your name will automatically be selected. If you are a researcher, you may not remove yourself as the researcher (the P.I. for the study, as well as the administrator can change the researcher). Depending on how your system is configured, you may be able to specify multiple researchers for a study. If you specify multiple researchers, each researcher has full control over the study.
The selection box lists only users who are researchers. |
| Principal Investigator (this feature might be disabled on your system) | Select the Principal Investigator for this study. The person you select will have full access to the study. If you see this option, then you must select a P.I.
The selection box lists only users who are principal investigators. |
| IRB Approval Code | Enter the IRB approval code here. This field is displayed to the administrator to help them keep track of studies. Depending on how your system is configured, this field may be required. If it is required, then only the administrator can change the IRB approval code once it has been entered. |
| IRB Approval Expiration Date | The date when the IRB approval expires. This field may not appear, depending on how your system is configured. If it does appear, you must provide a valid expiration date. The system will prevent you from adding new timeslots to take place after this date, and your study will become inactive (not approved and thus not visible to participants) after this date. You may not make a study active if the IRB approval has expired. Only the administrator can change the IRB approval expiration date once it has been entered. This is the reason why it defaults to blank to force you to choose a date. You may specify a date up to 5 years in the future. |
| Approved? | Select Yes if this study should show up on the list of studies that participants might sign up for. Ensure you have received the necessary approvals to run the study before choosing Yes. A study must be Approved and Active to show up on the list of studies that participants may sign up for.
If you select No, the study will not be visible to participants. Some systems are configured in a way that only the administrator can approve a study. If that is the case, you should request approval when you are ready to make the study visible to participants (a form is provided on the page to do so). As a researcher, you can always make an approved study invisible to participants (by making it not approved), but you may need the administrator to make it visible again. In addition, if you change key items about the study, specifically the name or descriptions, the study will automatically be made invisible to participants until the administrator reapproves it (depending on how your system is configured). The reason for this is that many IRBs approve very specific language for study names and descriptions, so the administrator needs to ensure the study is in proper compliance. |
| Email Approval Notice? (Visible to administrators only) | This Yes/No option will appear if the administrator is adding or updating the study that is not already approved. If they select Yes to Email Approval Notice and they approve the study (set Approved to Yes) at the same time, then an email will be sent to all researchers for the study, notifying them that their study was just approved. |
| Active Study? | Select Yes if this study is in progress. You must select Yes and the study must be Approved if you want the study to available for participants to sign up for.
If a study is Not Approved but is Active, then it does not show up to participants on the listing of studies, but it is accessible through other links if the participant has participated in it before and are viewing their participation history (in case the participant has follow-up questions about the study). It will also show up on the study information page (for an individual study) where it is listed as a pre-requisite or disqualifier for a study. The reason to select No is if the study is being kept for historical purposes, but should not show up on the list of studies participants can sign up for. Often, this is done so the system can enforce pre-requisites where the inactive study is a pre-requisite for an active study. |
Basic Study Information
| Field | Explanation |
|---|---|
| Pre-Requisites (this feature might be disabled on your system) | If there are studies a participant must participate in before participating in your study, choose them here. You may select multiple studies.
You may specify that participants must have participated in at least one, if not all of the studies specified. The system will handle enforcement of the pre-requisites in a strict or lenient fashion, depending on how your system is configured. In strict enforcement mode, the participant must have received credit for (participated in) the pre-requisite studies. In lenient enforcement mode, the participant must only be scheduled to participate in the pre-requisite studies (it is presumed that they will go on to complete the pre-requisite studies). You can ask your administrator how this is configured, if it is of concern. If your system is in lenient enforcement mode and a participant cancels a necessary pre-requisite for your study (they are warned of this), and your study is configured so that the researcher will receive notifications of cancellations or sign-ups, then the researcher will receive notification of the pre-requisite problem and can contact the participant if necessary. Depending on how your system is configured (Pre-Requisite/Disqualifier Display setting), participants may or may not see which studies you have specified as pre-requisites when they view your study. |
| Disqualifiers (this feature might be disabled on your system) | If there are any studies that a participant must not have participated in, please select them here. You may select multiple studies. The system will handle enforcements of the restriction during the sign-up process. If a participant has signed up for, or participated in, at least one of the studies specified as a disqualifier, then they will not be eligible to sign up for your study.
Depending on how your system is configured (Pre-Requisite/Disqualifier Display setting), participants may or may not see which studies you have specified as disqualifiers when they view your study. |
| Course Restrictions (this feature might be disabled on your system) | If you would only like participants enrolled in certain courses to participate in your study, select the eligible courses here. Participants who are not in at least one of the courses you selected will not see the study when they view the list of available studies. You may choose No Restrictions if you would like to make the study available to participants in any course.
There is a limit to how many courses can be listed as course restrictions for a study, and the limit is somewhere between 60 and 80 courses. The limit is varied depending on a few factors, and the system will simply not save the course restrictions for any courses that would take it over the limit. Note that course restrictions do not function as a disqualifier but rather as a qualifier. For example, if a participant is in both Course A and Course B, and the study is restricted to only those in Course A, the participant is eligible because they are in Course A, despite the fact Course B is not listed as a course restriction. In addition, using the same example above, the participant may assign the credit from the study to any of their courses, including those courses not listed in the course restriction (Course B in this example). Course Restrictions function solely to qualify participants for a study, and not to restrict their ability to assign credits to courses. |
| Age Restrictions (this feature might be disabled on your system) | If you would like to limit to participants within a certain age range, you can specify it here, and participants who do not qualify will not see the study at all.
For lab studies, the age restriction is enforced based on the date of the timeslot. For example, if a study has a minimum age limit of 18, and a participant is currently 17 but will turn 18 next week, the system will allow them to sign up for any timeslots that will take place after they have turned 18. For web studies, the age restriction is enforced based on their age at the time they sign up for the study. You may enter age restrictions up to two decimal points, for example 18.25 to 21.99. You may enter values as low as 0.01, for research with babies. For the maximum age limit, keep in mind that if you do not specify any values after the decimal point (for example, entering in just 29), then the system will interpret this as 29.00. What this means is that a participant who turned 29 three few months ago would be ineligible to participate because their age is now 29.25. If you want to include all 29 year olds, you can set the maximum age limit to 29.99. |
| Invitation Code (this feature might be disabled on your system) | If you would like to have a special sign-up password for this study, enter it here. This is known as an invitation code and applies just for this study. Participants must know the invitation code to sign up for this study. This is often used in cases where the researcher wants to personally select participants, so the researcher only provides the invitation code to the desired participants. Invitation codes are not case sensitive, and are in no way connected to any passwords users use to log in to the system.
If you do not need an invitation code, leave this field blank. |
| Is this a web-based study? (This feature might be disabled on your system) | This will list if the study is an online study, and the type of online study. This setting cannot be changed after a study is created. |
| Should participants be identified only by a unique, random ID code? | If enabled, then researchers will not see participant names, but instead an ID code to identify them. This setting only applies for online studies, and only if ID codes aren’t already enabled system-wide by the administrator. For external web studies, this setting is useful primarily in conjunction with placing %SURVEY_CODE% in the Study URL. Once this setting is enabled (to show ID codes), it cannot be changed back to showing names again, even if you remove %SURVEY_CODE% from the Study URL. |
| Study URL | The URL (web address, usually starting with https://) for your study. This is only required for web-based studies administered outside the system.
If you are setting up a web-based study outside the system and would like the system to pass a unique identifier in the URL so that you may easily identify participants and even have the system grant credit automatically, add the text %SURVEY_CODE% in the URL where you would like the identifier to be placed. This feature is most commonly used with online survey products like Qualtrics, SurveyMonkey, LimeSurvey, and similar products. This is discussed in further detail in the Web-Based (Online) Studies section of this documentation. If you are setting up a multi-part online study, you will need to specify the URL for each part of the study, and the URLs should be unique. |
| Study URL Display (single-part external web studies only) | If set to Yes, then participants may still access the Study URL even after they have been marked as having participated in the study. If set to No, the URL will not be available to them.
In all cases for external web studies, the URL will not be displayed until they have signed up for the study. Regardless of this setting, the URL will not be displayed after the timeslot is in the past. |
| Participant Sign-Up Deadline (this feature might be disabled on your system) | Enter the deadline date (before the study is scheduled to occur) that is the last possible date a participant may be allowed to sign up, in whole hours. |
| Should the Researcher receive an email notification when a participant signs up or cancels? | If set to Yes, the researcher for this study will receive an email notification whenever a participant signs up or cancels their sign-up for this study. The email notification will be sent to an email address based on the information the researcher has provided. See the Email Address Options section of this documentation for more information on how the email address is determined. Emails will contain the first 50 characters of the study name as part of the subject line in order to make it easier to sort the emails within an email program.
If set to Yes, researchers will also receive a notification if the system is in lenient pre-requisite enforcement mode; and a participant cancels a study that was a pre-requisite for the current study. Read the section on Pre-Requisites in this table for more information about this situation. Emails are sent to all researchers specified for the study, unless a specific researcher is assigned to the timeslot that the email notification is being sent about. See Timeslots Linked to Specific Researchers for more information. Emails are also sent in the case of a manual sign-up or cancellation (when the researcher and not participant performs the action). |
| Researchers at Timeslot-Level | If set to Yes, it will be possible (but not required) to assign a specific researcher from the list of researchers for the study to a specific timeslot. If set to No, then it is presumed that all researchers assigned to the study are responsible for all timeslots. See Timeslots Linked to a Specific Researcher for more information. This option only appears if the system is configured to allow multiple researchers per study. |
| Automatic Credit Granting | If set to Yes, timeslots that are more than a specified number of hours old and still in the Awaiting Action state will be changed to a credit grant. The check for timeslots in this situation is made only once per day. If an automatic credit grant is done, you may still change it later if necessary.
For online external web studies, the credit grant will take place (the specified number of hours) after the timeslot (participation deadline) has occurred (as opposed to being based on when the participant signed up. This feature is generally not useful in this situation (use External Study Credit Granting instead). The option will not appear for online survey studies (within the system) because credit granting generally occurs automatically, immediately after the participant completes the survey. |
| Can a participant sign up for this study more than once? (This feature might be disabled on your system) | If you would like to allow participants to sign up (and receive credit) for your study more than once (at different times), choose Yes. Otherwise, choose No.
If No is chosen, participants may only sign up for the study more than once if they had previously failed to show up for the study (a no-show). |
| Shared Comments | This is an optional area where you may enter any comments or notes about the study. These are visible to any researchers and PIs in the system, but not to participants. This field is useful if you want to make the technique used in the study visible to other researchers, so they can set your study as a disqualifier if necessary. This field can be up to 1,000 characters in length. |
| Private Comments | This is an optional area where you may enter any comments or notes about the study. These are only visible to the researchers (and PI) for this study. These are not visible to participants or to other researchers or PIs in the system. This field can be up to 1,000 characters in length. |
| Research Alternative? | If set to Yes, then this study is considered a research alternative study. Only an administrator may change this value (the default is No).
For various reasons, some participants may have a restriction “Limited to Research Alternative Studies” (typically, for accruing too many unexcused no-shows or being unable to consent). This status prevents them from signing up for regular studies. A participant with a “Limited” status may still sign up for a research alternative, however, as these studies are open to all participants. |
Multi-part Study Settings
(only applies if you select Multi-Part Standard Study or Multi-Part Online External Study on the Select Study Type page)
| Field | Explanation |
|---|---|
| Total Payment (paid studies only) | Enter the amount of total compensation for the study, typically the sum of the payment values for each part. The system cannot compute this automatically since it is possible to enter non-numeric values (e.g., “Amazon Gift Card”) in the other payment fields. |
| Part X Scheduling Range | For multi-part standard studies:
Specify the number of days (as a range) after the previous part is scheduled, that this part should be scheduled. The range may be the same value (e.g. “between 7 and 7 days”) if desired, but must be a whole number. See Multi-Part Lab Studies for more information. For multi-part online studies: Specify the number of hours after the participant receives credit (participation is marked) that this part will become available, and for how many hours it will remain available. The value can be a large number like 168 hours for 1 week, but it must be a whole number. See Multi-Part Online Studies for more information. |
| Part X Scheduling Leniency (multi-part standard studies only) | In some cases, you may want to ensure that the participant schedules the next part of the study to take place at exactly the same time (on a different date) as the previous part. If so, choose Yes for this option. If there is some flexibility to sign up any time within the Part X Scheduling range, choose No for this option. |
Creating or Modifying a Survey
| Field | Explanation |
|---|---|
| Introductory Text | Optional, up to 10,000 characters in length. Provide a set of text that will be displayed when a participant starts the survey. You may include HTML in this area, but please be sure you know what you are doing. If you would like to add a carriage-return (paragraph break), simply type in “
” (without the quotes). When you first create the online survey, the system may automatically insert some basic default text in this area. You may change any of this text as much as you like – the system will not change it back later as long as you save your changes. This is a good place to place any text for informed consent purposes. You may view how this text is displayed to participants by saving it, then going to Preview Introductory Text, which is available from the Section List page. |
| Closing Text | Optional, up to 7,000 characters in length. Provide a set of text that will be displayed after a participant completes the survey and saves their responses. This is an ideal place for debriefing information. You may include HTML in this area, but please be sure you know what you are doing. If you would like to add a carriage-return (paragraph break), simply type in “
” (without the quotes). You may view how this text is displayed to participants by saving it, then going to Preview Closing Text, which is available from the Section List page. |
| Display sections in random order? | You may specify a specific ordering for all sections or have the system randomize the order for all sections. You may also specify the order of some sections and a random order for other sections. If you specify the order for only some sections, you may also specify for each section, whether it should be displayed before or after the random-ordered sections. The system does not keep track of the random order sections were displayed for each participant. |
| Mobile Devices Allowed? | If set to Yes, the participants accessing the system using the mobile version (app) on a mobile device like a smartphone or tablet will be allowed to participate.
If the survey makes use of images or question and choice layout is important, it may be better to set this to No as the layout may be rendered differently on devices. Especially on devices like smartphones with small screen sizes. For technical reasons, there is no easy way to preview how questions will look on a mobile device except to login as a test participant using an actual mobile device. |
| Participant response review/change | If set to Yes, then participants may review and change responses just before they complete the online survey. They are given this opportunity after they complete the last section of the survey, before any closing text is shown. At this point, they can see all their responses and go back to any section to change them. Once they complete the online survey, they cannot go back at a later date and change any responses.
It may be useful to set this option to No (so that they are not allowed to review or change their responses at the end of the survey) if sections are somehow dependent on one another. Meaning that allowing participants to change their responses may affect the integrity of data collection. |
Once you have filled out the appropriate information, save it and the system will be updated immediately with the information. If you would like to add participation restrictions based on prescreen responses, you can do so when you update the study (see Prescreen Participation Restrictions). Otherwise, your next step is to add timeslots (sessions). See the Working with Timeslots section of this documentation for more information.
If you need to update this study, see Updating a Study.