
Migrating Accounts from ORSEE to Sona
A simple, easy-to-follow guide to transferring user accounts from ORSEE to Sona.
There are three parts to this guide. The first will introduce you to the basic export command you will need to use to download user information from ORSEE. Part two will cover the export process itself. Finally, the third and last part will walk you through using Sona’s Import Wizard to automatically create user accounts.
Please note that this process does not involve transferring prescreen responses or study sign-up data. If necessary, it is possible to create past studies in Sona and then add these studies to participant sign-up information using a batch sign-up process (for more information, please see the documentation and/or contact support).
Exporting Account Information from ORSEE for Easy Account Creation in Sona
Part 1: Introducing the Export Command
Before starting with the export process itself, we briefly introduce the command you will be using. This is both to prepare you for executing it in the following step, as well as familiarizing you with the possible fields you may include.
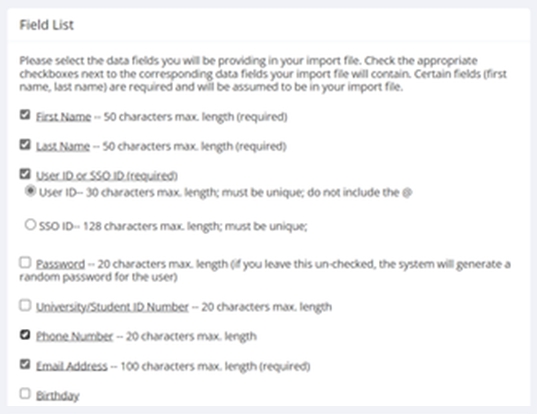
The command will save the following participant information: First Name, Last Name, User ID, Phone Number, and Email address. If your database does not include one or more of these fields, you can simply delete that section of the command. For example, if you do not have participant phone numbers, then you can delete the section phone_number AS 'Phone', in the next step.
mysql -u username -p orseedbname -e "SELECT fname AS 'First Name', lname AS 'Last Name', participant_id AS 'User ID', phone_number AS 'Phone', email AS 'Email' FROM or_participants" --batch --silent --skip-column-names | sed 's/\t/,/g' > orsee-to-sona-export.csvPart 2: How to export ORSEE participant data
This part of the guide covers the actual use of the command introduced above. The final result will be a CSV file containing the downloaded user account information.
Step 1. Open your ORSEE Interface:
|
Step 2. Run the Command:
Example: (You can copy this code to your clipboard by moving your cursor over the code block and clicking on the “Copy Code to Clipboard” button that will appear in the top-left corner of the block) Copy Code to Clipboard |
Step 3. Enter MySQL Password:
|
Step 4. Check the Exported File:
|
Part 3: Import ORSEE participant data
During the import process, you will be asked to select the course you wish to add your participants to. If you have not created a course yet, you should do this first. Select Course Listings from the Set Up dropdown menu. Then click the “Add New Course” button. Then enter a course name and click “Save Changes”. If your participants are not students, or will not enrolled in an actual course, you may create any group name you find convenient (e.g., “Paid Participants”, “Participant Pool”, etc.).
Step 1. Go to the User Import Wizard in Sona
|
Step 2. Import Wizard – Step 1 – Choose the User Type:
|
Step 3. Import Wizard – Step 2 – Define the Fields:
|
Step 4. Import Wizard – Step 3 – Data Field Order:
|
Step 5. Import Wizard – Step 4 – Upload or Paste the Data:
|
Step 6. Processing and Validating the Data:
|
Step 7. Finalizing the Import:
|
By following these steps, you can efficiently import a CSV file of users into the Sona system, automatically creating participant accounts in Sona from your ORSEE participant pool user information. For more detailed instructions or troubleshooting, refer to the Sona system documentation or contact technical support.