Ensuring a Smooth User Import
Published October 26, 2022
Tips for Configuring Your Excel File
Some Pre-Checklist Tips
Before we start on our checklist, there are two more general tips we should cover first. We’ll call these Starting Tips, even though one of them will be more about filetypes than the actual import process.
First Starting Tip
The first Starting Tip definitely qualifies as a tip, and tends to solve any problems you might have with the import problem more often than not. That’s why it goes first. It’s also simple: If you’re having trouble uploading your Excel file (i.e., a .xlsx file), open a new Excel file, copy the import page contents from the old file to your clipboard, and then select “Paste Values” to paste the old import roster as plaintext into the new file. If you aren’t certain what “Paste Values” means, why this process works 9 times out of 10, or how to do it, that’s ok. We’ll cover it in more detail after the checklist. If you are in the process of troubleshooting now, and you want to try this but aren’t sure how to, just skip down to the “Troubleshooting” section at end of this post. Otherwise, just keep in mind that this is a useful trick to try first if you run into problems with the import process.
Second Starting Tip
We’ve already mentioned Excel files and filetypes, and we’ll be talking more about importing files throughout. The second and last Starting Tip addresses exactly what kind of file we’re referring to here. Only .xlsx files can be uploaded to your Sona site. So even before you start the import process, you should make sure that the file you intend to import is (or is saved as) an .xlsx file. If you attempt to upload a different file type (e.g., a CSV or .xls file) you’ll get an error message when you hit the “Continue” button:
“System Message: Please upload a valid Excel file (XLSX format).”
Please note that this does not mean that you cannot use CSV files or similarly formatted files (e.g., an .xls spreadsheet) to import users. It’s just that the upload feature doesn’t support these file types. You can still copy and paste from such files instead of uploading if that is easier. After all, that’s why the very same page that allows you to select a file from your computer also has a giant textbox for you to use as an alternative. Although we’re focusing on the upload method here, we don’t want to downplay the utility of the copy and paste import method. You can use this method to import from non-XLSX file types by copying from e.g., an .xls or CSV file and pasting directly into the “Paste delimited text” textbox. If you want to click the “Choose file” button, however, to upload a file from your computer, then it needs to be an .xlsx file.
The Checklist
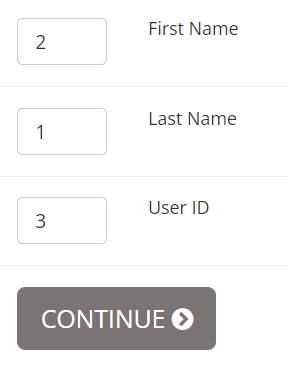
- Carefully check the “Import Wizard — Step 3” page to make sure both the order and number of the fields matches the order and number of fields (columns) in your file. After you select which optional field types your file contains (e.g., alternate email address, password, etc.), and you’ve checked that your file also contains the three required fields (First Name, Last Name, and User ID without the @yourschool.edu part), clicking the continue button brings you to the field numbering page. Make sure the order of the fields matches the numbers, and that no values are repeated. So, for example, if your first column in your .xlsx file is “last name” and the second is “first name”, then make sure to put a “2” for the First Name field and an “1” for the Last Name field:
- Avoid any additional columns or cells. Getting the order of your spreadsheet columns to match the order you select is great, but you should also limit your spreadsheet to these columns. That is, you don’t want to have extra columns or cells that you don’t intend to be part of your import process:

- Make sure the “header” checkbox matches your files first row. There’s a checkbox right under the import file button that is checked by default:
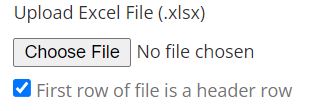 This is to let the system know that the first row of your spreadsheet contains headers. Though headers aren’t strictly necessary (because you are selecting which fields your file has and in which order), they’re common enough to warrant the default checked status. But if your spreadsheet doesn’t have headers, please remember to uncheck this box. You don’t want the first row excluded from your import unless it consists of headers.
 - Use single worksheets for single course, instructor, and researcher import. You should really only upload a file with multiple tabs or worksheets if you select the multiple course import option:
 For any other option, using multiple worksheets or tabs in the same file is unnecessary and may cause problems. Be sure to check that your spreadsheet has no additional worksheets (or tabs). For example, if you store instructors as a tab in the same workbook you are using to import students to courses, you’ll want to create new files for each tab or worksheet.
 - Do not use special characters, formatting, encryption, or password protection for worksheets or workbooks. Most characters that Excel will allow you to use to name or rename your worksheets are likely to be just fine, particularly as Excel will remove things like subscripts and will typically not allow highly irregular fonts (e.g., wingdings). But try not to go out of your way to be creative here, as certain formatting choices may cause errors when the system attempts to process your file. Security measures, though, are riskier here.If you try to upload a file encrypted with a password, or that contains specially protected worksheets, the chances are your security settings will prevent the system from reading your file. So you will want to avoid using password protection, encryption, or similar settings in the file you wish to upload. If you are using e.g., password protected files that you wish to retain after the import process, then you will probably want to copy and paste the contents of your worksheet or worksheets using the “Paste Special” method described at the end of this post. After you finish the import, you can delete the copies so that all that remains are your secured files.
- Make sure your worksheets have unique names. Again, unless you are uploading multiple worksheets using the multiple course option, you should really only have a single worksheet per file. If you are using the multiple course option, however, then it becomes much more critical to make sure they have unique names. Luckily, most of the time the entire point of using names is to be able to easily distinguish between worksheets (and Excel will likely stop you from using a worksheet name already in use in your workbook). So, while you certainly can use the generic “Sheet1, Sheet 2,…”, you are unlikely to encounter any problems using e.g., using course titles as worksheet names. Just make sure that each worksheet has its own, unique name.
- Use “plain text” in your files. Remove any special formatting, such as bolded text or italics, before uploading. You want your “data” to be as close to plain text as possible. This may include dragging the “fill” handle in Excel to auto-fill a column or row with the same function or formula used in a “template” cell (e.g., something that creates what looks like text in a cell, but if you look at the values in that cell you its value is something such as
= SUBSTITUTE ( CONCAT ( LEFT (A2,1), ".", B2), CHAR (32), "")). If you have a column in your worksheet that might have special characters, was generated using Excel functions or auto-fill, or in any other way may be read as non-text formatting, there’s a quick and easy fix. Simply copy the cells in the relevant column, paste them as text into a basic text editor like Notepad or TextEdit (make sure to select the “Plain Text” format for applications like TextEdit which can allow for “Rich Text”). Once you see the cell entries in your text editor, delete them from excel. Now you can copy the “Plain Text” from the text editor back into the column: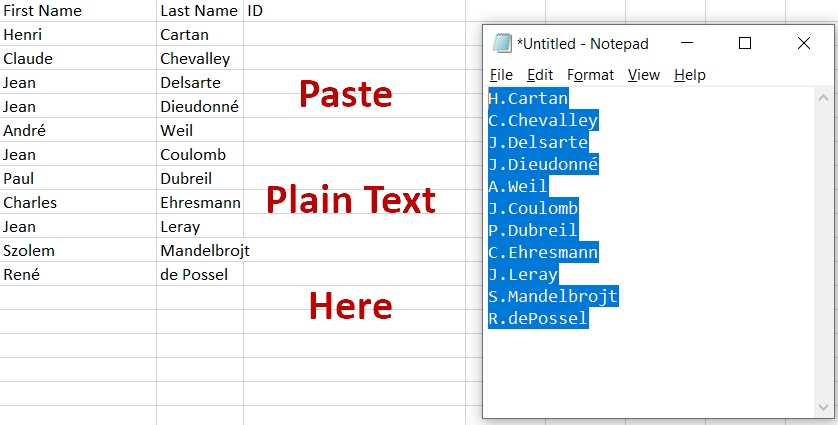
- Avoid using the back button. If you have to change something, it’s better to just restart the process. There are, after all, only a few steps, so it won’t take that much longer than if you hit the back button. And while hitting the back button may not create problems, why risk it?
- Uploading more than 300 users at once increases the likelihood of encountering problems. It’s tempting to import as many participants as you can in one go, and indeed that’s why we included the option to upload XLSX files in the first place. Importing very large numbers of users at a time, however, can put too large of a load on the system, increasing the chances that the system will stall, time out, or run into other issues. There is no hard and fast rule here, as there are several factors involved rather than something like a cut-off limit at 300. Often, uploading a file with more than 300 users will not cause any issues. The system doesn’t count up to a particular number of users and then stop.That said, you are more likely to encounter errors if you are trying to import more than 300 users at a time. And the more often you do attempt to, the more likely it is that one of those times will not work smoothly. Since this post and this checklist are concerned with optimizing the import process, you can think of the number 300 here as the point at which you are no longer necessarily “ensuring a smooth import process”. It may work, and it may work every time, but the more you exceed 300 and the more frequently you do, the greater the changes of error.
That’s all for our checklist! Essentially, we just want you to know some of the common errors that happen and how to avoid them. And you may have noticed that many items share something in common- simplicity. Whether it’s removing special fonts or using generic names for worksheets, as a general rule the simpler the better (and, contrariwise, the fancier you try to make your file the more likely you are to run into some issues that complicate the import process).
Troubleshooting Tip
First, please stay calm. Even the most dire errors can be repaired if you contact us, as apart from any technical solutions we may have for you, there is always our ability restore your system using a recent back up (one of the many perks of using our cloud-based services, even if we do say so ourselves!).
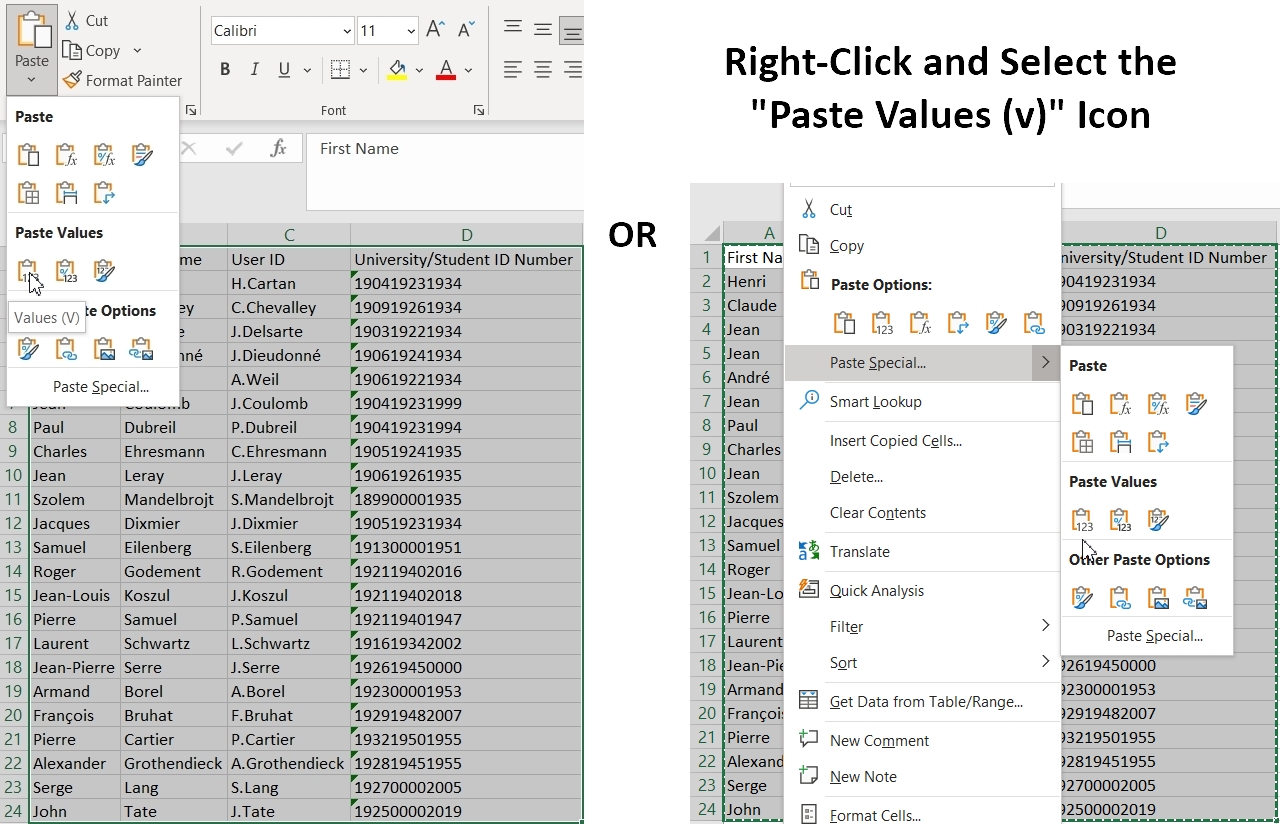
That’s not the tip, though. If we’re being honest, we’re just repackaging the first Starting Tip from above and going into more detail. If you think about it, that’s sort of what troubleshooting often is: Solving a problem by getting into more details about a step in some process that was already covered. Whether you got to this section by scrolling down from the first Starting Tip above or not, you can solve problems with the import problems most of the time simply by correctly copying and pasting into a new Excel file. Here’s how:
Simply copy the worksheet contents from the file you are trying to upload and then use the “paste values” option to paste only the values from the original spreadsheet into a new one. Don’t just copy and paste from the old spreadsheet (doing this will likely cause Excel to faithfully copy the old problem into the new spreadsheet). Instead, open the dropdown menu under the “Paste” select the “Paste Values (V)” item from the “Paste Values” section of the menu. Alternatively, after you copy from your original spreadsheet, you can right-click on the first cell in a new, blank spreadsheet, select “Paste Special” from the displayed options, and then click on the “Paste Values (V)” icon. Both methods are depicted below.
And that’s it! Nine out of ten times, this will work and your import will proceed smoothly from this point onwards.