Adding an imprint to outgoing mail in Sona
Published August 26, 2022
Many universities (among other organizations) make it a policy to have all departments, institutes, organizations, etc., within the university include sender information along with contact details in all published information. Often, this information is not required (but may be encouraged), while in others it may be required by university policies. In fact, including an imprint or impressum in certain forms of media is required by law in some countries (see, for example, the policies and practices required under § 5 Telemediengesetz (TMG), the German telemedia act). While this practice generally applies more to published content than to emails, including the same information in outgoing emails as would be required or recommended on a website by the same party is fairly standard (if not necessarily mandatory).
In most cases, though, imprints are a standard practice to ensure that all recipients know who the responsible party for the message is and how they may be contacted. And while your university may not have a policy concerning imprints, or may only have a policy that pertains to published information (for example, on the website of your lab, institute, department, etc.), without specifically addressing its inclusion in emails.
However, whether it is required or just desired, we want to make sure that you know how to include in all outgoing emails. So, without further ado, here’s how to include an imprint or impressum in your Sona Systems emails:
-
- You’ll need to navigate to the imprint textbox, located on the Update System Text page. To access this page, select the “Mass Emails and Announcements” option from the “Tasks” dropdown menu, as shown below:
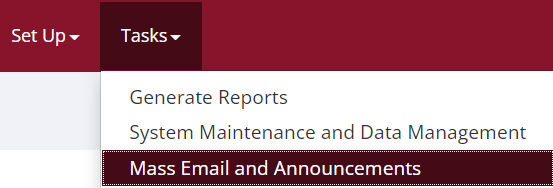
- You’ll need to navigate to the imprint textbox, located on the Update System Text page. To access this page, select the “Mass Emails and Announcements” option from the “Tasks” dropdown menu, as shown below:
-
- Next, click on the “Update System Text” button to access this page:
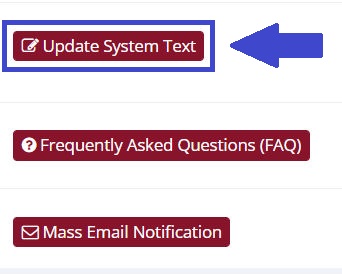
- Next, click on the “Update System Text” button to access this page:
-
- This will take you to the page we want. Scroll down almost to the bottom of this page until you find the “Text included in emails” textbox, depicted below:

- This will take you to the page we want. Scroll down almost to the bottom of this page until you find the “Text included in emails” textbox, depicted below:
-
- Now simply type (or copy and paste) the desired imprint text into this box.
-
- Finally, don’t forget to hit the “Save Changes” button at the bottom of the page to make sure the work you just did was not done in vain!

- Finally, don’t forget to hit the “Save Changes” button at the bottom of the page to make sure the work you just did was not done in vain!
Here’s an example of what an email might look like after filling out the textbox with the desired information: